Curriculum
Bright Sparks No Code STEM Kit
Basic Electronics
0/3STEM Projects
0/29-
Flashing Danger Light 🚨⚡
 Preview
 -
Fan Counter-Clockwise Rotation 🔄🌀
-
Fan Clockwise Rotation 🔃🌀
-
Push Button Controlled Doorbell 🚪🔔
-
Push Button Controlled Water Tap 🚰🔘
-
Touch Button Controlled Water Tap 🚰🔵
-
Magnetic Reed Switch Controlled Water Tap 🚰🔄🧲
-
Push Button-Activated Presentation Laser Pointer 💡🔘
-
Touch-Activated Light 💡🔵
-
Touch-Activated Fan 𖣘🔵
-
Touch Activated Call Bell 🔔🔵
-
Touch-Activated Laser Presentation Pointer 🔵💡
-
Magic Light using Reed Switch 🌟🧲
-
Magic Fan / Motor Control with Reed Switch 𖣘🧲
-
Magic Buzzer using Reed Switch 🔔🧲
-
Magic Laser Pointer Shot using Magnetic Reed Switch 🎯🧲
-
Magic Touchless Water Dispenser 💦🧲
-
Motion Activated Night Light 💡🚶♂️
-
Motion Activated Burglar Alarm 🚨🚶♂️
-
Smoke and Gas Detection Alarm 🚨🔥🛡️
-
Sound-Activated Light 💡🔊
-
Fire Alert System with LED & Buzzer 🔥🚨💡
-
Rain Detection Alarm System 🌧️🚨
-
Automatic Street Light 🌃💡
-
Human Proximity Detection with Obstacle Sensor 🚶♂️📡
-
IR Proximity-Sensor Activated Escalator 🚶♂️⬆️
-
Touchless Hand Sanitizer Dispenser 🚫🖐️🧴
-
Gravity Sense Light using Tilt Sensor 🌍💡
-
Laser Tripwire Alarm System 🔦🚨🚷
Robotics Projects
0/1Flashing Danger Light 🚨⚡
Description:
Build a simple yet powerful flashing LED light that responds to button presses with your Bright Sparks No Code STEM Kit. When you press the button, the LED lights up; release it, and the LED turns off. Use this setup to send an SOS signal in Morse code: three short presses (S), three long presses (O), followed by three short presses (S). This project teaches basic circuitry and introduces the concept of Morse code, making it both educational and potentially life-saving.
Parts Used:
- SparkBoard
- 4 AA Battery Holder Power Supply
- 5 ✘ Female to Female Jumper Wires
- Push Button Module
- Red/Green Led Module
Wiring Diagram:
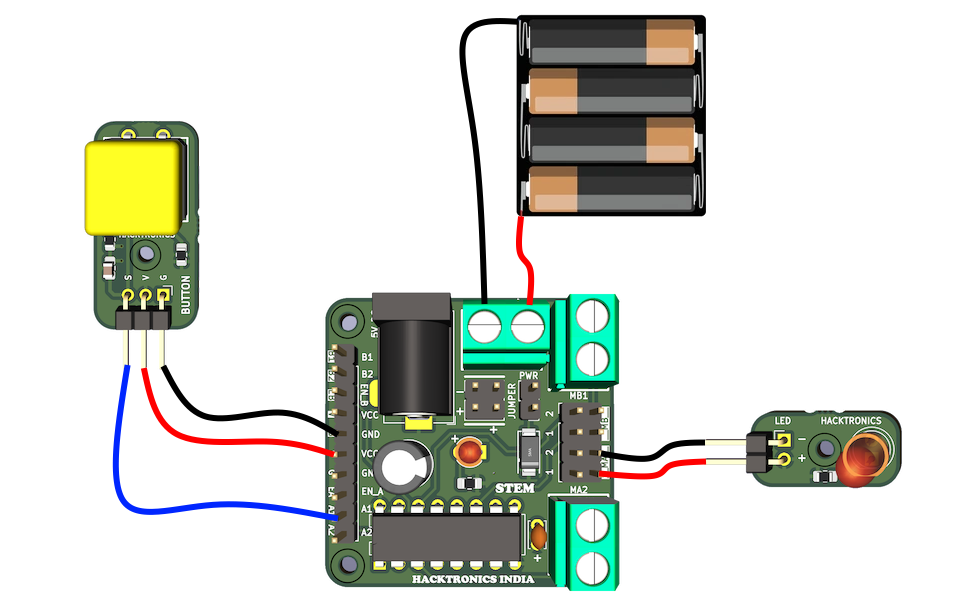
Wiring diagram of Flashing Danger Light
Steps:
- Connect battery red wire to the positive screw terminal
- Connect battery black wire to the negative screw terminal
- Connect the button V to the VCC on the SparkBoard
- Connect the button G to the GND on the SparkBoard
- Connect the button S to the A1 pin on the SparkBoard
- Connect the LED + to the MA1 pin on the SparkBoard
- Connect the LED – to the MA2 pin on the SparkBoard
Now, when you press the button, the LED turns on, and when you release it, the LED turns off. You can use this setup to create a flashing LED by toggling the button, or send Morse code signals, such as SOS, by following the same procedure.